Bringing American Landmarks to Life: The Ultimate Guide to USA Multilayer Laser Cut Files
In the evolving world of digital fabrication, the ability to transform a flat sheet of material into a stunning three-dimensional object has revolutionized how we approach crafting, interior design, and architectural modeling. At the heart of this transformation lies the USA Multilayer Laser Cut File, a sophisticated digital template designed specifically for creators who wish to celebrate American heritage through modern technology. Whether you are a hobbyist with a desktop cutter or a professional running a CNC router shop, understanding how these files work can unlock a new dimension of creativity for your projects.
This article explores the intricacies of multilayer layout files, their practical applications, and why they have become an essential tool for makers looking to produce high-quality, 3D representations of important buildings in the United States.
What is a Multilayer Laser Cut File?
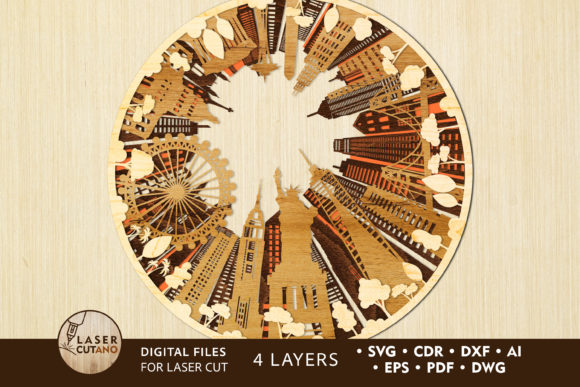
To understand the value of a USA Laser Cut File Svg Cutting Template, one must first grasp the concept of multilayer design. Unlike traditional 2D cutting patterns that result in a single flat shape, a multilayer file consists of several distinct layers of vector paths. In the specific case of the popular USA landmark collections, the design is typically split into four separate layers.
When these layers are cut from materials like plywood, MDF, or acrylic and stacked upon one another, they create depth, shadow, and perspective. This technique mimics the look of a topographical map or an architectural relief model. The result is not just a picture of a building; it is a tangible, textured piece of art that captures the grandeur of structures like the Capitol Building, the Statue of Liberty, or the Golden Gate Bridge in a way that flat prints simply cannot.
The Technology Behind the Design
These digital files are engineered with precision. They are specially prepared for compatibility with a wide range of cutting machines, including:
- Laser Cutters: CO2 and fiber lasers that burn or engrave designs into materials.
- CNC Routers: Computer-controlled milling machines ideal for thicker woods and metals.
- Plotter Cutters: Devices used for cutting vinyl, cardstock, and paper.
The versatility of the file format is a key feature. Upon purchase, users typically receive a compressed .zip folder containing the design in multiple industry-standard formats: .AI (Adobe Illustrator), .SVG (Scalable Vector Graphics), .DXF and .DWG (AutoCAD), .CDR (CorelDRAW), .EPS, and .PDF. This ensures that regardless of the software you use—whether it's LightBurn, Inkscape, Illustrator, or CorelDraw—you have a compatible file ready to go. Important Note: Always remember to unzip the folder before attempting to open or import the files into your design software.
Why Choose USA Landmark Multilayer Layouts?
The decision to use a pre-made multilayer layout offers significant advantages over designing complex 3D models from scratch. For many creators, the most time-consuming part of a project is the vectorization process—converting an image into clean, cuttable lines. By utilizing a professionally prepared USA Digital multilayer layout, you bypass hours of technical work and focus immediately on the creative aspects: material selection, finishing, and assembly.
Educational and Decorative Significance
These products serve a dual purpose. In educational settings, they act as engaging tools for teaching history and geography. Students can assemble the layers while learning about the architectural significance of US landmarks. In home and office decor, they provide a sophisticated aesthetic. A 39 x 39 inch finished product makes a bold statement on a wall, adding texture and cultural relevance to any space.
Furthermore, these files support the growing trend of "maker culture," where individuals take pride in creating personalized items. Because the files are scalable, you can adapt the design to fit small shelves or large lobby walls, making them relevant for both DIY enthusiasts and commercial businesses.
Material Selection and Specifications
One of the most exciting aspects of working with these templates is the freedom to choose your medium. The multilayer design shines when executed with the right materials. The recommended finished size for this specific USA collection is 39 x 39 inches, composed of 4 layers.
Recommended Materials
You can cut these designs from a diverse array of substances, each offering a unique finish:
- Plywood and MDF: Ideal for a rustic, natural wood look. These materials are easy to sand and paint.
- Acrylic and Plexiglas: Perfect for modern, sleek displays. Using different colors for each layer can create a vibrant, pop-art effect.
- Metal: For industrial-style decor, though this requires more powerful cutting equipment.
- Cardboard and Paper: Excellent for prototyping, school projects, or lightweight temporary displays.
Thickness Matters
To achieve the best 3D effect without compromising structural integrity, material thickness is crucial. For wood-based projects, a thickness between 3 mm to 6 mm (approximately 1/8 inch to 1/4 inch) is recommended.
Why this range? If the material is too thin, the layers may not provide enough depth to be noticeable. If it is too thick, the internal details of the design might become fragile or difficult to weed out. When stacking four layers of 6 mm plywood, you achieve a total depth of nearly an inch, creating a substantial and impressive relief.
Assembly and Finishing: From Flat to 3D
The journey from a digital file to a finished masterpiece involves a few critical steps. Once you have downloaded and unzipped your files, the workflow generally follows this path:
1. Preparation and Cutting
Import your chosen file format into your machine's software. Ensure your material is flat and secured. Run a test cut on a scrap piece to verify power and speed settings. Once satisfied, proceed to cut all four layers.
2. Sorting and Cleaning
After cutting, carefully remove the pieces from the waste material. Clean off any soot (from laser cutting) or dust (from CNC routing). This step is vital for ensuring a strong bond during gluing.
3. Layering and Gluing
This is where the magic happens. Each layer of the multilayer model must be glued sequentially. Start with the base layer (usually the largest outline) and work your way up to the finest details. Use wood glue for porous materials or super glue/acrylic cement for plastics. Clamping the layers lightly while the adhesive dries ensures a flush fit.
4. Painting and Sealing
While some creators prefer the natural grain of wood, others choose to paint the layers. You can paint each layer a different shade to emphasize depth, or paint the entire assembly a uniform color for a monochromatic sculpture. Applying a sealant or varnish protects the finished product from humidity and wear.
Common Misunderstandings and Tips for Success
As with any digital fabrication project, there are nuances that beginners often overlook. Clarifying these points can save time and materials.
Scaling Issues: While you can increase the size of the design freely, be cautious when reducing it. The USA multilayer layout contains thin elements that connect intricate parts of the buildings. If you shrink the design too much, these connecting bridges may become too fragile to survive the cutting or handling process. Always preview your scaled design to ensure no lines have become impossibly thin.
File Compatibility: A common assumption is that all vector files work exactly the same in every software. However, sometimes fonts or specific line weights may shift when converting between .DXF and .SVG. It is best to inspect the file in your specific software before sending it to the machine.
Kerf Compensation: For ultra-precise fits, especially with thicker materials, experienced users may need to account for "kerf"—the width of material removed by the laser or bit. While these files are designed to be user-friendly, fine-tuning your machine's offset settings can result in tighter joints between layers.
The Broader Impact on Creativity and Business
The availability of high-quality USA Laser Cut File Svg Cutting Templates has democratized the production of complex architectural models. Small business owners can now offer customized cityscape decor without needing an in-house architect. Educators can create tactile learning aids affordably. Hobbyists can tackle projects that previously seemed out of reach.
This technology bridges the gap between digital design and physical reality. It allows us to preserve and celebrate the iconic skyline of the United States in a format that is interactive and enduring. Whether displayed in a corporate office to inspire patriotism or in a living room as a conversation starter, these multilayer creations stand as a testament to the power of combining historical appreciation with modern manufacturing.
In conclusion, the USA Multilayer Laser Cut File is more than just a download; it is a gateway to creating something extraordinary. With the right materials, a bit of patience, and these expertly crafted templates, you can turn a simple sheet of wood or acrylic into a majestic tribute to American architecture. So, unzip that folder, fire up your cutter, and start building your own piece of history today.